A propane adapter is an indispensable tool for gas or propane Airsoft guns, but metal or plastic propane adapters tend to get damaged quickly due to frequent use. It’s pretty common for Airsoft gun owners to use several propane adapters over a short time. But a brilliant way to solve this is by simply making a propane adapter for your Airsoft guns.
Here’s how to make a propane adapter for airsoft in 6 easy steps:
- Gather the tools you need.
- Construct the propane nozzle.
- Assemble the nozzle holder.
- Put the propane adapter together.
- Apply the finishing touches.
- Test it out.
The process of making a propane adapter for your Airsoft gun doesn’t involve any advanced technical knowledge and is much simpler and straightforward than many think. Although multiple steps are involved, by focusing on one at a time, following the extensive guide in this article, it’s possible to make a proper propane adapter.
1. Gather the Tools You Need
The first thing to do is to get the tools you need in place. To make a propane adapter, use the following:
- Torch head
- Propane gas can
- Brass coupler
- Brass nipple
- Brass compression nut
- Brass bushing
Here are the roles each of these tools perform:
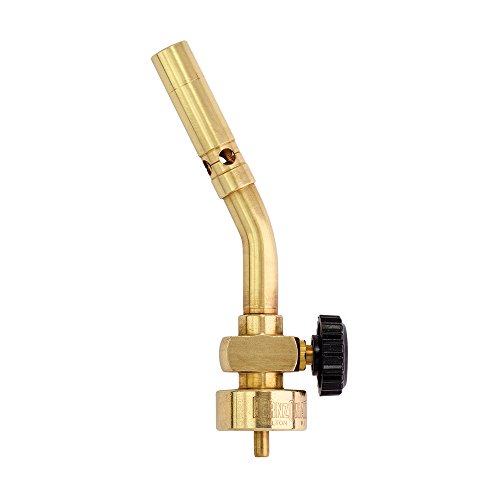
Torch Head
The torch head (or blowtorch) is a tool that burns fuel to apply heat and Flame for several applications. Torch heads usually share a connection with a refillable storage tank and use fuel – either gaseous or liquid – stored in the tank to power the heating or flaming.
Usually, torch heads have a pump affixed for users to regulate their output.
One of the top applications of the torch head is in metalworking, where it’s used to add Flame
to the welding work. Others include soldering and brazing.
There are two major variations of torch heads, which are:
- Liquid-fueled and
- Gas-fueled torch heads
Simply, liquid-fueled ones work with liquid fuels while gas-fueled ones work with gases. The focus here will be on the gas-fueled ones.
Otherwise known as a propane torch, the gas-fueled torch head usually has a forced-air supply, often coming from a small air blower.
There are several torch head brands out there, but the usually recommended ones are those made by Bernzomatic, an American manufacturer.
The BernzOmatic Flame Torch Head (available on Amazon) will be very well suited to this use. It is sturdy, inexpensive, and reliable.
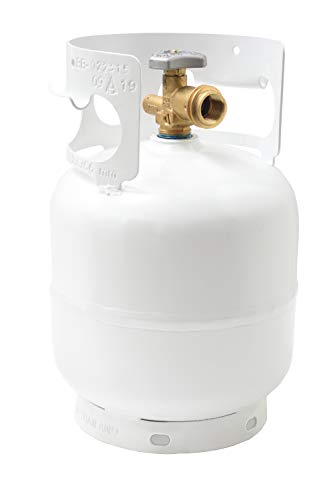
Propane Gas Can
Start by completely emptying the propane gas can of its contents. You’ll be conducting some tests on the can, and it may be dangerous if those are carried out on a tank with some content. Thus, you should ensure that it’s adequately drained.
If you feel the gas you have is old and should be changed, then you can get the highly-rated Flame King 5 Pound Propane Cylinder (available on Amazon.com). Made of high-grade alloy steel, the Flame King is rugged and highly durable. It is also portable and easy to carry about, thanks to the comfortable hand collar.
Other instruments you might need include an o-ring, which is required to block any escape of gas. The o-ring usually comes in a pack of 100 or 150, and I highly recommend that you get the Beeray High Press Hydraulic Rubber (available on Amazon.com) ring Customer testimonials to say that it withstands against weakening from highly viscous gas. The other tool is the measuring tape to get precise ramifications to achieve a fine finish.

Brass Coupler
The set of tools you need to get are those that you’ll use in putting the adapter together, one of which is a coupler. There are several materials to choose from when selecting a coupler, but it’s best to choose one that has the propensity to withstand the highly flammable propane.
One material that fits this perfectly is brass. An alloy made of copper and zinc, brass combines the key attributes of copper, which include being a good conductor of heat and other corrosive materials with the extraordinary strength of zinc.
As a result, using brass couplers in conveying propane gas becomes less of something to worry about. It’s safe, durable, and can withstand harsh conditions such as excessive heat, which is a common feature of propane gas use.
For specific brands to choose from, the brass Anderson Metals Brass Pipe Fitting (available on Amazon.com) tops the chart thanks to its solid ductility that can withstand high pressure.

Brass Nipple
There’s usually the need to keep the ends of the pipe fittings extra tight and secure whenever there’s industrial piping work. This is because often, in industrial uses, the transported materials are almost always dangerous if they leak into the environment in any careless manner.
To prevent this, nipples are often affixed to ensure that the piping seal is secure.
Just as with all other parts of the fitting system, there are some possible materials to choose from for a nipple, but the one we recommend is brass. Because of its crucial role, the nipple must be strong, durable, and able to withstand any form of corrosive material, one of which is propane. Brass can deliver all these qualities and more.
If you’re unsure as to specific brands, the Merit Brass Nipple (available from Amazon) has a higher corrosion resistance when compared to other types made from steel. Nevertheless, If you prefer something apart from brass, stainless steel nipples such as the Quickun 304 Stainless Steel Nipple Pipe Fitting (available on Amazon.com) which is known to have a quick and easy installation process.
| Image | Title | Prime | Check on Amazon |
|---|---|---|---|
 |
Red Brass Pipe Fitting, Nipple, Schedule 40 Seamless, 1/4" NPT Male X 3" Length | PrimeEligible | Check on Amazon |
 |
Quickun 304 Stainless Steel Pipe Fitting, 1/2" NPT x 1/2" NPT Male Malleable Nipple Cast Pipe 10" Length | PrimeEligible | Check on Amazon |
Brass Compression Nut
Whenever you need to join two parts of a piping fitting together, the compression nut does the job for you. Like the above, brass comes highly recommended of all the possible materials you can use for the compression nut.
For one, brass is highly useful for fittings that require you to occasionally disassemble them, one of which is the propane adapter. Brass nuts name it easy for you to disengage the joined parts without harming either part. Then, just as with the other tools, brass can sustain very high-pressure work where toxic gases such as propane are to be transported.
For specific products, the LTWFITTING 1/4-Inch Brass Compression Nut (available on Amazon) is a good option. Also, it is pretty affordable and comes in a set of 25.

Brass Bushing
Although there are several purposes for bushing, the major one is that it serves as a connector device.
Bushing helps connect two piping materials of different sizes to aid the proper passage of materials in piping systems.
The significant advantage that brass material has in this regard is that it doesn’t rust, or at worst, it takes several years for rust to set in. This is despite the fact that it’ll be exposed to semi-liquids all the time.
The uxcell Sleeve Bearing (available on Amazon.com) should satisfy your needs with it’s renowned oilless friction-free feature. Bushings and bearings made of bronze are also becoming popular since they can resist metal fatigue better. If you prefer those made of bronze, the Hillman Group 58084 Sleeve Bearings (available on Amazon.com) are a good alternative.
| Image | Title | Prime | Check on Amazon |
|---|---|---|---|
 |
uxcell Sleeve Bearing 12mm Bore x 16mm OD x 20mm Length Plain Bearings Wrapped Oilless Bushings Pack of 2 | PrimeEligible | Check on Amazon |
 |
The Hillman Group 58084 Sleeve Bearing, Bronze 5/8 X 3/4 X 1-1/8-Inch, 4-Pack | PrimeEligible | Check on Amazon |
2. Construct the Propane Nozzle and Prepare the Adapter
Before you begin, ensure the nozzle is in good condition, and there are no significant amounts of gases remaining inside the tank.
The steps to then take are as follows:
- Sever the top of the propane gas tank.
- Confirm the contents of the can are safe enough.
- Remove the valve using pliers.
- Cut the nozzle to fit the compression nut leaving enough space for the o-ring to properly seal.
3. Assemble the Nozzle Holder
After coupling the nozzle holder, the rest becomes relatively easy. All you have to do is screw the remaining parts together.
Simply flatten the valve so it can make sealing much easier. Insert it in the compression nut and place it in the o-ring. Then screw the Teflon bushing to the brass compression nut.
I highly recommend that you get the ½” to ¼” (3.8 to 3.2 cm) Dana Teflon Spindle Bushings (available on Amazon). Tighten the fittings properly so that they make a proper seal against any potential escape of propane.
Be sure to avoid aggressive tightening, as you could dislocate or even damage the o-ring.

4. Put the Propane Adapter Together
You should exercise a tremendous amount of attention and care when you get to this part.
The steps you’ll take to get the propane adapter together include:
- Rip through the torch head up to a measurement of 1 centimeter (0.39 inches) using a large pair of scissors.
- Carve out a portion of 2-3cm (0.79-1.2 inches) of the top of the torch head to prepare it for gluing.
- Get the two brass parts together so that they are joined together properly.
- Apply glue in-between and hold it in place until the glue is dry.
You should take extra care here so that you don’t make mistakes that will ruin the efforts made so far. One common mistake you can easily make here is not holding the parts properly in the right places. The glue will eventually fail to keep the brass parts together, leading to disintegration and eventual malfunctioning.
Also, the parts can quickly come apart if you don’t give glue sufficient time to set it in place adequately. I recommend that you allow for at least 24 hours for the glued pieces to dry properly.
5. Apply the Finishing Touches
At this stage, it’s about ensuring that the adapter functions seamlessly. Get the threaded adapter screwed into the nozzle you just completed. Then take the adapter to the propane tank. Now you may want to test out if the completed adapter doesn’t have any leaks that may result in danger.
It’s best to insert the adapter inside a pool of water and not insert the propane tank alone to avoid compromising its content.
Inside the water, look out for any bubbles, no matter how minimal. Significant instances of bubbles show that there’s probably a leak in the adapter built up. This occurrence might require you to tighten or glue one of the parts.
Unfortunately, it might also require that you disentangle the entire adapter and rebuild it again. However, if there are no significant bubbles, then the adapter is ready for use.
The reason for all of these is to assure safety. Leaving any leaks, no matter how minimal, can be risky. Allowing the escape of propane that should otherwise be securely trapped in can lead to potential fire incidents. Then, gases seeping out may not be optimal for your health.
6. Test It Out
You want to test your creation out to ensure that it’s working well with your Airsoft gun.
The steps you need to take include:
- Screw together the propane tank with the adapter.
- Switch on the valve and get the gas flowing so as to power your Airsoft gun.
- Connect the valve to the clip or magazine of your gun.
- Apply some pressure to get the gas into the gun to get it flowing properly.
- Remove the valve and switch it off if you feel you have got sufficient gas.
- Make use of your Airsoft gun to get all the fun you want.
I recommend that you first lubricate your Airsoft mag and some other parts of the gun with
some silicone oil for seamless entertainment.
Final Thoughts
Making a propane adapter for your gas Airsoft gun may be somewhat tedious, but it’s not very complicated. Besides, it’s worth it to save money not only once but for a long time. Apart from the cost savings, you get to do good work and create something. By the time you’re finished, you’ll be proud of your very own creation.
Please remember: The presented information is solely restricted to informational purposes ONLY. The use of propane gas can be dangerous, and you should endeavor to handle it with care or contact a professional for assistance.